QTP/UFT,QualityCenter,QC,ALM,ManualTesting,Ruby on rails,WATIR Framework,Ruby,VBScripting,Selenium,QCOpenTestArchitecture,ExcelReports,Certifications,LoadRunner,InterviewQuestions,BPT,API's,VSTS,QTP Trainings, Test Complete,Ranorex,Jenkins
1)Find – You can now do a search in playback UI which will search request headers/bodies, response headers/bodies and the web test context.
2)Add Extraction Rule – In the playback UI, you can now highlight some text in the response and select “Add Extraction Rule”.This will automatically add a rule the web test.
3)Goto webtest – This option will jump you from the request you are on in the playback UI to the same request in the web test.Also if you are on a query string or form post parameter, it will jump you to that parameter in the web test editor.
4)Show Recorded Result – This option will load a playback session with what was recorded.During recording, we now create a web test result of what was recorded.This will help when you want to try and figure out what is different between your current playback session and the recorded session.
VSTS Web Testing supports activity recording, as long as there exists a website to record against. To record activities of a web application, we can create a new test project or use an existing one. Adding a web test case is more specific to web testing. When it is added, an activity recorder is started in which we can browse the web application like browsing through a normal browser.
On the address bar, we can enter the URL of the personal website, including the port selected by the ASP.NET Development Server. Browsing to this location will be recorded in the Web Test Recorder explorer bar; as would any other URLs that are entered. Once the desired tests have been recorded, we can close the browser windows and save the test. The project will automatically include the Web test case file along with each of the recorded requests.
Recording with Think Time in Mind
The ThinkTime property on a Web test request refers to the amount of time a user spends "thinking" on the current page before issuing the next request. Think time delays are used to approximate real user behavior during a load test. Because think time can dramatically affect the amount of load a Web test can generate, it can be globally disabled in a load test to apply greater load to a target server. Disabling ThinkTime allows you to issue requests to the server as fast as possible without delay between requests.
The Web test recorder automatically records think time at the same time that requests to the Web application are recorded. During recording, try to approximate the amount of time a user would normally spend on each page. Once the recording is complete, it is very important to check the recorded think time for each request. Inadvertently long ThinkTimes can dramatically affect the rate at which a Web test generates requests. ThinkTimes are turned off by default in the Web test viewer. As a result, long ThinkTimes might not be immediately apparent. When ThinkTimes are turned on in the Web test viewer, you will see "Thinking…[n]" displayed in the HTTP Status column until the next request begins. ThinkTimes are turned on by default in load tests. The ThinkTime counter is paused when recording is paused and while entering a comment.
Inserting Comments
Inserting comments during the recording can be a helpful aid for creating an effective Web test, especially when the Web test contains many requests. You should use comments to make notes about what logical action is about to take place at different points in the Web test such as "Logging in," "Adding item X to the shopping cart," and so on. These comments can be very helpful when you later modify the Web test in the Web test editor.
You can also use comments to make notes about validation rules you need to add to ensure the Web test is successful. It is much easier to decide what needs to be validated on each request while recording and looking at the pages than when looking at a list of HTTP requests in the Web test editor.
Customization
Selecting any of the nodes within the WebTest tree will allow you to modify the data inside the Properties window.
You can also group requests together using a transaction. Be careful not to confuse the term "transaction" with a programming concept in which state is committed or not committed as a unit. Within Web test cases, transactions only encapsulate actions into a group that can later be enumerated using code. Also, transactions are used when reporting on load—how many transactions per second, for example.
Using the Web Test Viewer to Verify a Web Test
Before adding a Web test to a load test, and running it for a long period of time, it is important to be sure that the test works exactly as intended. This is where the Web test viewer comes in to consideration. The Web test viewer allows you to watch a Web test as it runs, and to view all aspects of a previous test run.
Verifying a newly-created Web test goes beyond looking at the outcome of the test run and seeing whether it passed. For example, for a Web test without validation rules passed, means that no exceptions were thrown, no rules failed, and no HTTP errors occurred. Verification includes making sure the Web test exhibits the correct behavior on the target Web application, in addition to executing without any errors. It is important to review the response for each request to make sure that it is correct.
Running a Web Test Case
After recording a test you are ready to begin executing it. To execute all the tests within a project, simply run the project. This will open up the Test Results windows and mark each test as pending while it is in progress, and Passed/Failed once execution completes. Test selection and execution is also available from the Test Manager and Test View windows.
Individual Web test files (test cases or test fixtures) can also be run by opening them up and clicking the Run button.
Requests can also provide credentials for logging on to the targeted site using standard authentication methods. The dialogs for credentials allow for loading the login data from a data source.
Each result from a request is saved, and selecting each request allows you to navigate its detail, viewing the resulting page's HTML or raw request/response text.
As part of a test execution, the Web test engine verifies if all the URLs on the page are valid links. These links appear as child nodes below the request show the HTTP status returned by a request to each of the URLs.
Request Rules
Although checking for valid hyperlinks on a response page is a useful feature, it is not sufficient in validating that the page is functioning correctly. For example, on entering valid credentials, the Web test needs to verify that the login was successful. Similarly, when the credentials are invalid, you need to check that an appropriate error message is displayed on the page. To support this, each Web request can include extraction rules and validation rules.
Extraction Rules
Extraction rules capture a response value so that at a later time the value can be used within a request. Rather than parsing the entire HTTP response manually, the extraction-rules provide a means of focusing in on a particular data item within the response. The extracted data item can then be validated or used again in a subsequent post back. One extraction-rule is automatically added when we record each page. That rule is an ExtractHiddenFields rule whose data is posted back in the second request of the Web test case. During the subsequent request, this data is submitted back in a hidden field on the page. Other extraction-rule options are ExtractAttributeValue, ExtractHttpHeader, ExtractRegularExpression, and ExtractText. Rather than relying on automatically recorded hidden field data, extraction rules can be manually added and customized as needed.
Validation Rules
Validation rules allow the test writer to examine the entire HTTP response and verify that it is correct. For example, valid credentials should cause the LOGOUT hyperlink and "Welcome " to appear in the HTML response. A validation-rule that checks for these items in the response should be added. The validation-rules verify that this text appears somewhere within the response body.
If a particular rule fails, the request will be marked as failed, and the Details tab will provide an explanation for what failed.
This type of validation-rule is a ValidationRuleFindText. It searches the entire response body, looking for the specified text. In order to handle complex searching, regular expressions are supported as part of ValidationRuleFindText.
In addition to ValidationRuleFindText, built-in validation-rules include ValidationRuleRequestTime, ValidationRuleRequiredAttributeValue, and ValidationRuleRequiredTag.
Binding Test Data to a Data Source
Both validation and extraction rules provide for text entry within the Properties window of virtually every node. However, the fact that the text can be pulled from a database makes Visual Studio Web Test powerful. This means we can define a collection of inputs that do or don't conform to the specified requirements.
To test using a data source, we can click the Add Data Source button on the toolbar of the Web test. In the ensuing dialog box, specify an OLE DB Provider, perhaps using an *.mdf file that can also be added to the test project. After opening the database in the server explorer, we define a table that will contain the necessary test data.
Once a test has been configured with a data source, it is necessary to return to the Edit Run Settings dialog box and change the run count to one run per data source row. In this way, the test will repeat for each row in the newly configured data source, and during each run, the parameters associated with the data source will be assigned the value in the column for the particular row.
Generating Web Test Code
Taking advantage of all the functionality we have considered so far has not required any code to be written. However, additional Web test customization is available using code. This is necessary to handle constructs like looping and branching within a test, or to call out to another Web test. VSTS Web Testing provides the facility of generating the code for a particular test case. Included on the toolbar for a web test case is a Generate Code button. Clicking this button prompts for a test name, and then generates a CS/VB file corresponding to Web case. The generated code includes each validation and extraction rule that may have been added. In addition, data such as the view state is set and passed as part of the Web request.
For a C# project, the new C# 2.0 iterator is used: after each request, the code returns the next Web request through a yield return statement that separates out one request from the next.
We should think of generating the code only if we are going to customize a test doing so provides a great starting point for customization of a particular Web test case, or even multiple cases, with a little refactoring.
Extending VSTS Web Testing
The available request rules and the ability to write custom code from generated Web tests covers the most common Web testing scenarios. However, it sometimes makes more sense to extend VSTS Web Testing by creating custom validation and extraction rules, or by coding custom Web test plug-ins. Such extensions must be defined in a separate assembly, and can be used across multiple Web testing projects. When defined, the new Web test extension assemblies may be referenced by the Web test's project so that it appears in a requests selection of Add dialog boxes.
The available dialog boxes are not only for validation and extraction rules, but for Request and Test plug-ins as well. Request callbacks can be added separately to each request, performing pre-interception and post-interception on the request. Test callbacks run pre-interception and post-interception code on entire set of requests. They are initially called at the beginning of the test case, and then again at the end of the same test case. For example, consider defining a callback that checks whether all Web pages in the test conform to XHTML, or one that sets up a cookie for use within each Web request. If the plug-in that performed this validation was a request callback, then it could be added individually to each request within the test. Alternatively, the callback could be a test callback that hooked up validation for all requests during the pre-test execution stage.
Earlier, we mentioned that custom validation and extraction rules are also possible. To create such rules, we derive from
Microsoft.VisualStudio.QualityTools.WebTestFramework.Validation and
Microsoft.VisualStudio.QualityTools.WebTestFramework.ExtractionRule instead of
Microsoft.VisualStudio.QualityTools.WebTestFramework.WebTestPlugin or
Web requests through JavaScript, ActiveX controls, and applets are not supported within the VSTS Web Testing functionality. Similarly, VSTS Web Testing is not designed to be a user interface (UI) testing tool. It will not execute client-side JavaScript and verify the results. Even a simple menu click-and-expand type action cannot be simulated by the tool. Even though it simulates particular browser clients to the server, it does nothing in the way of verifying that the response back renders correctly within that client browser, even when it is Microsoft Internet Explorer. VSTS Web Testing is a wire-based testing protocol. It verifies what is sent and received across the wire, and provides no built-in capability for testing how the data is rendered by the browser.
Providing this type of testing is difficult and cumbersome. However, there are some methods to consider for certain situations. It is reasonable to assume that if the same response occurs multiple times, it will render and function within the browser in the same manner. Therefore, if you manually verify that a particular response is correct you can expect the same response will behave correctly the next time. For example, by checking that the JavaScript is behaving appropriately and that the page renders correctly. Using this principal, you can visually verify the response, manually checking that a script behaves appropriately. Now, a validation test can be created that checks for a similar response, using wildcards to handle minor data changes such as variances in data time, user name, advertising, and so on. If, in future runs of the test, the page changes, then the response should be re-verified and the test should be updated accordingly, thereby providing a level of change control for the page. This is not something a team is likely to deploy in mass, but it does provide a good baseline testing mechanism and forces controlled variation.
Debugging Common Web Test Problems
Web Server Responds Differently During Execution than Recording
In a perfect world, you would record a set of requests to a Web application, run the Web test, and receive the same responses from the server that you saw during recording. Unfortunately, Web applications sometimes behave differently during Web test execution than they do during recording. This type of problem can occur for a variety of reasons and often results in an error similar to the following:
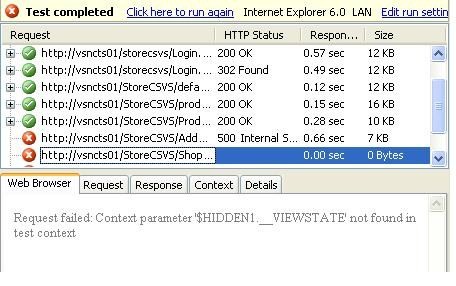
Request failed: $HIDDEN1.__VIEWSTATE not found in test context.
This error occurs when the Web test attempts to use a hidden field in the Web test context that it was unable to locate and extract from a previous response page it received.
The following screenshot demonstrates this problem when it is originated from a server error. In the second-but-last request, the server error caused hidden fields the next request depends on to not exist on the page.
There are many reasons for why a server might respond differently during execution than it did during recording. Some of the more common reasons are summarized in the following sections. In all cases, validation rules can be added to requests to automatically verify that the server responds with the correct content.
One-Time-Use Data
One common cause of this problem is one-time-use data, such as when a Web application creates a unique user name. Playing back this kind of Web test without adding data binding or a random value can result in the Web application displaying an error when the test attempts to create a duplicate username.
JavaScript Redirects
A Web application that uses JavaScript redirects (setting window.location) might respond differently during execution than during recording because the Web test engine does not run script code. This type of problem can be easily corrected by inserting the URL the script redirects to and moving necessary extraction rules to the new request from the page that performs the redirect. Because this problem exists in the Web test immediately after recording, the only extraction rule likely to be present is ExtractHiddenFields.
Redirects to an Error Page
When there is a server error, a Web application might redirect to an error page, but not return an HTTP 400 or 500 level response code. This indicates that there is either a problem in the Web application itself or a problem in the requests being issued by the Web test.
Handling View State and Other Dynamic Parameters
Even before ASP.NET 1.0 was introduced, the __VIEWSTATE hidden form field, Web applications used dynamically-generated form and querystring parameters to pass information between pages. These dynamic parameters require special consideration in a Web test because they can change every time the Web test runs. A Web test with hard-coded parameter values might not work for very long after recording, or even at all.
Web tests enable testing with dynamic parameters by using extraction rules and context binding. Extraction rules are placed on requests for pages that will contain a dynamic value. When the extraction rule runs, it extracts the dynamic value into the Web test context using a configurable name such as "myparam". A subsequent request then contains a querystring or form parameter with a value of {{myparam}}. When the Web test runs, the value in the Web test context is substituted for {{myparam}}.
The sequence of events for an extraction rule is as follows:
1. The Web test engine begins executing Request1.
2. Request1 is sent to the target server.
3. A response is received from the target server.
4. The extraction rule on Request1 runs on the response page.
5. The extraction rule places an entry in the Web test context.
6. The Web test engine begins executing Request2.
7. Querystring parameters, form parameters, and any other context-bound values on Request2 are substituted from the Web test context.
8. Request2 is sent to the target server.
Automatic Hidden Field Tracking
Web tests contain special support for handling dynamic hidden fields, such as __VIEWSTATE. When a Web test is recorded, hidden fields are automatically matched with form and querystring parameters. What a match is found, the ExtractHiddenFields rule is applied to the request generating the source of the hidden field. At this time, context bindings are applied to parameters on the request, making use of the hidden fields.
ExtractHiddenFields is a special extraction rule because, unlike rules that extract one value into the context, it extracts every hidden field value on the page into the Web test context. Normal extraction rules use the ContextParameter property to determine the name to use for the context parameter, but ExtractHiddenFields uses that property only to differentiate from multiple groups of hidden fields that might be in the context simultaneously. For example, an ExtractHiddenFields rule with ContextParameter set to 1 will extract __VIEWSTATE as "$Hidden1.__VIEWSTATE".
Fixing __EVENTTARGET and other hidden form fields modified by JavaScript
When a hidden field is modified by Javascript in an OnClick event handler, it is possible that automatic hidden field binding will be incorrectly applied. This is a known bug in the release version of Visual Studio 2005.
With ASP.NET sites, this problem most commonly occurs when a Web control calls the __doPostBack() JavaScript method to set the __EVENTTARGET hidden field as shown above. Automatic hidden field binding results in the form parameter having a value such as {{$HIDDEN1.__EVENTTARGET}}, instead of the actual value — btnNext. To correct this problem, the parameter value must be set to the value being set in Javascript (for example, btnNext).
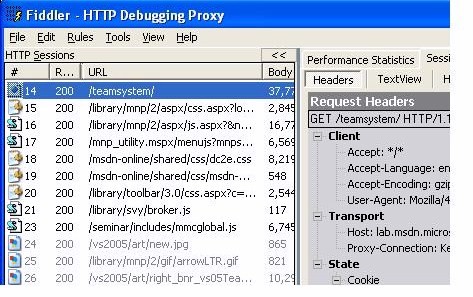
Requests Missed During Recording
As discussed in the Understanding the Web Test Recorder section, some requests might not be recorded by the Web Test Recorder (for example, AJAX requests and some pop-up windows). Fortunately there is a great tool written by Eric Lawrence called Fiddler. that can help with this. Fiddler works by acting as a proxy server and can intercept all HTTP traffic (no SSL support yet). Two options are described below for using Fiddler to correct a Web test that cannot be recorded with the standard Web Test Recorder.
References:
This article is based upon articles written by Mark Michaelis and Josh Christie in MSDN.
Conclusion
In this article we saw an overview of VSTS Web Testing functionality. We saw how to record and execute as well as customize web test. In so doing, we saw how VSTS Web Testing is very easy to set up, and how a significant percentage of testing is supported without ever having to write any code. This is a significant feature that should compel teams to begin testing early and often within the development cycle, not just waiting until QA engineers obtain access to the product.
VSTS Web Testing doesn't stop with recording. There are many possibilities for extending the recorded tests. The ability to generate test code makes it easy to move to coded tests when special customization is required. The code is simple enough that many developers may choose to rely on code rather than a mouse-oriented UI for creating Web test cases. Regardless, extending VSTS Web Testing is simple, providing an excellent platform for additional functionality to be added.
This article provides an overview of testing web application functionality using VSTS. It begins by providing a step-by-step approach on how to set up a Web test case and customize it without writing any code. This article demonstrates an approachability of VSTS Web Testing by all those participating in the development process, including non-developer types. Web test cases can easily be coded as well, and we will describe how to use coded Web tests or extend the built-in Web testing support.
Before we begin, readers should be aware that VSTS functionality is not targeted at testing the user interface. It doesn't run JavaScript in a webpage or validate the appearance of a page within multiple browsers. Rather, the testing approach is to examine HTTP data flowing over the wire and provide various rules for validating this data.